English
 Español
 русский
News
Content
- 1 How to Install Tensile Fabric: The Direct Answer
- 2 Understanding PVC Tensile Fabric Before You Install
- 3 Tools and Materials Required for Tensile Fabric Installation
- 4 Site Preparation: The Step Most Installers Rush
- 5 Step-by-Step Installation Process for PVC Tensile Fabric
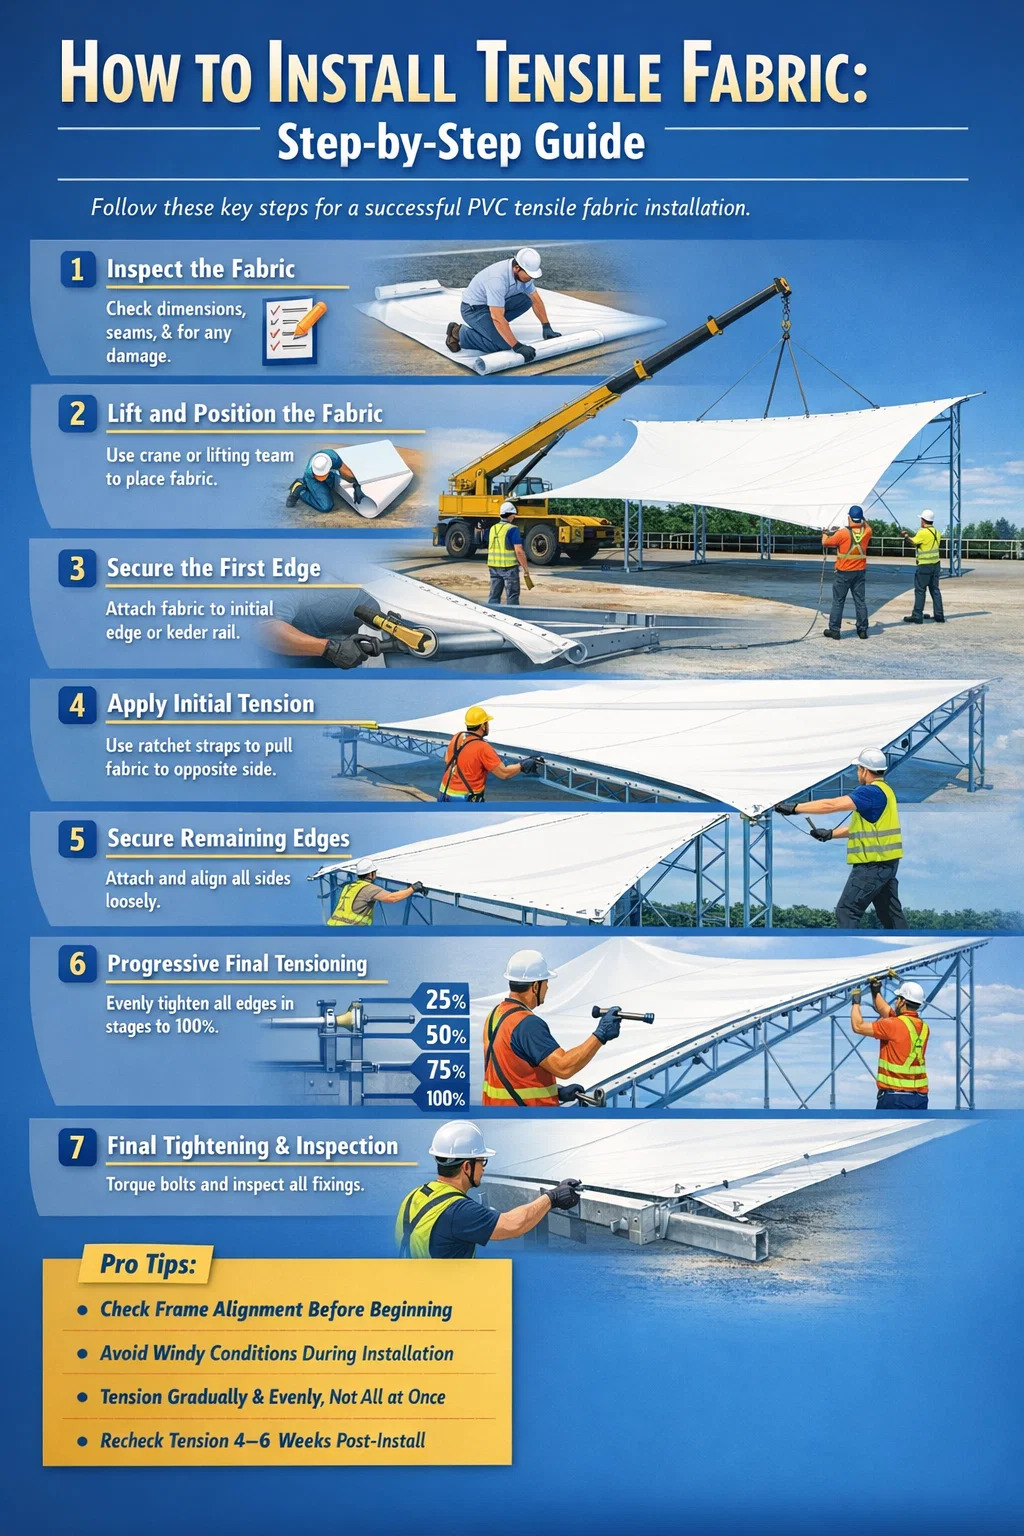
- 5.1 Step 1 — Inspect the Fabric Panel Before Unrolling
- 5.2 Step 2 — Lift and Position the Fabric onto the Structure
- 5.3 Step 3 — Secure the First Edge
- 5.4 Step 4 — Apply Initial Tension to Opposite Edge
- 5.5 Step 5 — Secure the Remaining Edges
- 5.6 Step 6 — Progressive Final Tensioning
- 5.7 Step 7 — Final Bolt Tightening and Hardware Inspection
- 6 Tensile Fabric Fixing Systems: Which One to Use
- 7 Common Mistakes During Tensile Fabric Installation and How to Avoid Them
- 8 Special Considerations for Large-Span PVC Tensile Fabric Structures
- 9 Post-Installation Inspection Checklist
- 10 Maintenance Schedule to Protect Your PVC Tensile Fabric Investment
- 11 When to Call a Specialist: Limits of DIY Tensile Fabric Installation
How to Install Tensile Fabric: The Direct Answer
Installing tensile fabric — particularly PVC tensile fabric — requires a structured sequence: site preparation, frame erection, fabric unrolling and positioning, edge tensioning, and final anchoring. The process is not simply about pulling material tight; it involves calculated tension distribution to prevent deformation, sagging, or premature failure. When done correctly, a properly installed PVC tensile fabric structure can last 15 to 25 years with minimal maintenance.
Whether you are installing a shade sail over a commercial courtyard, a tensile canopy for an outdoor event venue, or a large architectural membrane roof, the core installation principles remain the same. This guide walks through every stage in detail, so you have a reliable reference from start to finish.
Understanding PVC Tensile Fabric Before You Install
Before picking up a single tool, you need to understand the material you are working with. PVC tensile fabric is a coated technical textile made by laminating polyvinyl chloride (PVC) onto a base polyester yarn grid. This construction gives the material its key properties: high tensile strength, dimensional stability under load, UV resistance, and water impermeability.
Common PVC tensile fabric weights used in architectural and commercial installations range from 650 g/m² to 1,100 g/m². Lighter fabrics around 650–750 g/m² suit shade structures and temporary shelters, while heavier fabrics at 900–1,100 g/m² are used in permanent roofing, stadium canopies, and large-span tensile structures.
Key Properties That Affect Installation
- Tensile strength: typically 3,000–6,000 N/5cm in warp and weft directions
- Tear resistance: important for wind-loaded structures
- Thermal expansion: PVC expands and contracts with temperature, which must be factored into tensioning
- Surface coating: some fabrics have PVDF or lacquer topcoats that affect how they respond to clamping hardware
- Weld seams: factory-welded seam strength should meet or exceed 80% of base fabric strength
Understanding these properties helps you select the right tensioning hardware, set correct pre-tension values, and avoid over-stressing the fabric during installation.
Tools and Materials Required for Tensile Fabric Installation
Having the right tools on-site before installation begins saves time, reduces errors, and protects both the fabric and the workers involved. Below is a comprehensive list of what you will need for a standard PVC tensile fabric installation.
| Tool / Material | Purpose | Notes |
|---|---|---|
| Ratchet straps / come-alongs | Initial fabric pulling and positioning | Use with edge rope or keder rail |
| Tensioning winches | Controlled final tensioning | Worm-gear type for precision |
| Torque wrench | Securing bolts to spec | Prevents over-tightening hardware |
| Keder rail / aluminium extrusions | Edge attachment system | Common in permanent structures |
| Stainless steel plate clamps | Point fixings at corners and edges | 316-grade stainless recommended |
| Spirit level and measuring tape | Alignment checking | Laser level preferred for large spans |
| Rubber mallets and protective pads | Seating fabric in rails without damage | Never use steel hammers directly |
| Lifting equipment (crane or scaffold) | Positioning fabric on large-span frames | Required for spans over 10 meters |
| Fabric cleaner and applicator | Post-installation cleaning | PVC-compatible, pH-neutral solutions |
Site Preparation: The Step Most Installers Rush
Poor site preparation is the leading cause of installation problems. Before the PVC tensile fabric arrives on site, the structural frame or anchor points must be fully erected, checked for plumb and level, and confirmed to match the fabrication drawings. Any deviation greater than ±5mm from the design dimensions can result in uneven tension distribution across the fabric panel.
Checklist Before Fabric Arrives on Site
- Confirm all steel or aluminium frame members are installed, plumbed, and welded or bolted per engineering drawings
- Verify concrete footings or anchor bases have reached full cure strength (typically 28 days for standard concrete)
- Check that all keder rail or clamping hardware is pre-installed on the frame
- Measure diagonal dimensions of the frame opening to confirm it is square — the two diagonals should be within 10mm of each other
- Clear the area below and around the structure of debris, sharp objects, or anything that could snag or puncture the fabric during unrolling
- Check weather forecast — do not begin fabric installation if wind speeds exceed 25 km/h or if rain is imminent
- Ensure access equipment (scaffold, boom lift, or elevated work platform) is in position and safety-checked
One frequently overlooked step is checking the temperature on installation day. PVC tensile fabric should ideally be installed when ambient temperatures are between 10°C and 30°C. In very cold conditions, PVC becomes stiffer and less pliable, making it harder to seat into keder rails. In very hot conditions, the fabric relaxes and may appear slack post-installation once it cools.
Step-by-Step Installation Process for PVC Tensile Fabric
The following sequence applies to most commercial and architectural PVC tensile fabric installations. Adjust based on the specific edge attachment system used — keder rail, plate clamp, or rope-in-channel.
Step 1 — Inspect the Fabric Panel Before Unrolling
Before the roll is opened, check the delivery documentation to confirm the fabric panel matches the order: correct dimensions, material grade, and weld seam locations. Once the roll is opened, lay the fabric on a clean tarpaulin or protective ground cover. Inspect for any transport damage — cuts, abrasion marks, or deformed webbing straps. Check that all corner fittings, eyelets, or keder edges are intact and correctly positioned.
Do not drag the fabric across rough ground. Even brief contact with concrete or gravel can abrade the PVC coating, compromising UV resistance and long-term durability.
Step 2 — Lift and Position the Fabric onto the Structure
For small panels under approximately 30 m², a team of four to six workers can manually lift and position the fabric. For larger panels, a crane or telehandler with a spreader bar is required. Attach lifting slings only to designated lifting points — never to the fabric body itself.
Position the fabric over the structure so that the longest edge aligns with the longest structural member. This minimises the distance each edge must travel to reach its attachment point, reducing the risk of uneven handling stress during the next stage.
Step 3 — Secure the First Edge
Always begin with one fixed or low-movement edge — typically a straight edge along a ridge beam or primary structural member. For keder rail systems, slide the keder rope or beading into the aluminium channel starting from one end and working toward the other. Use a rubber mallet and a smooth-edged pushing tool to seat the keder bead fully into the slot without distorting it.
For plate clamp systems, position the fabric fold under the clamping plate, insert bolts finger-tight, and confirm alignment before any final tightening. At this stage, all fixings should be hand-tight only — final torquing comes later.
Step 4 — Apply Initial Tension to Opposite Edge
With the first edge secured, move to the opposite edge. Attach ratchet straps or come-along pullers to the corner fittings or tensioning loops and pull the fabric toward its attachment point. The goal at this stage is not final tension — it is simply to remove the bulk slack so the fabric lies flat across the structure.
As you pull, watch the fabric surface. Any diagonal wrinkles suggest the pull is uneven. Adjust the direction and magnitude of pull on each strap independently to keep the fabric panel tracking straight. Once the opposite edge reaches its attachment hardware, secure it loosely — hand-tight clamps or partially inserted keder bead.
Step 5 — Secure the Remaining Edges
With two opposite edges loosely attached, work on the remaining two edges using the same sequence: attach, align, pull lightly, and secure loosely. By the end of this step, all four edges (or all perimeter edges for complex shapes) should be loosely attached to the structure. The fabric will still appear somewhat slack — this is expected and correct at this stage.
Step 6 — Progressive Final Tensioning
This is the most critical phase of the entire installation. Final tensioning must be applied gradually and evenly across all edges simultaneously — not edge by edge. The correct method is to work in incremental passes: apply 25% of target tension to all edges, then 50%, then 75%, then 100%. This progressive approach ensures the fabric stretches uniformly across its full area without concentration of stress at any single point.
For keder rail systems, final tensioning is achieved by tightening the tensioning bolts or turnbuckles integrated into the rail end caps. For plate clamp systems, bolts are tightened to the specified torque values — typically 25–40 Nm for M10 stainless bolts, depending on the hardware specification.
Throughout tensioning, monitor the fabric surface continuously. The correctly tensioned surface of a PVC tensile fabric panel should be:
- Free of diagonal stress wrinkles running across the panel
- Taut when pressed lightly with a hand, with minimal deflection
- Curved in the intended geometry (anticlastic, synclastic, or flat, per design)
- Free of pooling areas or flat spots that would allow water to accumulate
Step 7 — Final Bolt Tightening and Hardware Inspection
Once full tension is achieved, go around every fixing point systematically and tighten all bolts to the specified torque. Use a calibrated torque wrench — guessing by feel is not acceptable for structural installations. Record the torque values applied at each fixing point for the maintenance log.
Check that keder bead is fully and evenly seated in all rail channels. Any section of bead that is not fully seated will create a localised stress concentration that can lead to edge tear failures, particularly under wind loading.
Tensile Fabric Fixing Systems: Which One to Use
The choice of edge fixing system significantly affects both the installation process and the long-term performance of the tensile structure. Here is a breakdown of the most common systems used with PVC tensile fabric.
| System | Best For | Load Distribution | Re-tensioning Ease |
|---|---|---|---|
| Keder rail (aluminium) | Permanent structures, straight edges | Excellent — continuous edge load | Moderate |
| Plate clamp (stainless steel) | High-tension architectural structures | Good — point loading at intervals | Easy |
| Rope-in-channel (boltrope) | Curved edges, event structures | Good — distributed via rope | Easy |
| Eyelet and lacing | Low-budget, temporary applications | Poor — point stress at eyelets | Very easy |
| Webbing strap and buckle | Shade sails, domestic canopies | Moderate — corner-focused | Very easy |
For long-term commercial and architectural PVC tensile fabric installations, the keder rail system is generally the preferred choice because it distributes edge loads continuously along the entire perimeter rather than concentrating stress at discrete point fixings. This translates directly into longer fabric life and reduced risk of edge tear.
Common Mistakes During Tensile Fabric Installation and How to Avoid Them
Even experienced installation teams make avoidable errors. Understanding the most frequent mistakes saves time, money, and potentially the fabric panel itself.
Over-Tensioning
Pulling the fabric tighter than the design specification does not make it stronger — it accelerates creep deformation in the PVC coating, stresses weld seams beyond their design capacity, and overloads the supporting structure. Design pre-tension values for architectural PVC tensile fabric typically fall in the range of 1.5–3.0 kN/m. Always work from the engineering specification, not visual judgment.
Tensioning One Edge at a Time
Fully tensioning one edge before the others are attached forces that single edge to carry all the initial pre-tension load asymmetrically. This distorts the fabric geometry and creates uneven residual stresses. Always attach all edges loosely before beginning final tensioning, and always tension in incremental passes across all edges.
Installing in High Wind
A PVC tensile fabric panel with a surface area of 50 m² acts like a large sail in wind. At 30 km/h, the dynamic load on a partially secured panel can exceed the manual holding capacity of a four-person team. Wind-related installation accidents are a leading cause of both fabric damage and worker injury on tensile structure sites.
Incorrect Fabric Orientation
Most PVC tensile fabrics have different tensile properties in the warp (longitudinal) and weft (transverse) directions. The engineering design specifies which direction should align with the primary load path. Installing the fabric rotated 90° from its design orientation can significantly reduce structural performance. Always confirm orientation against the fabrication drawing before securing any edge.
Skipping the Re-tension Check
New PVC tensile fabric undergoes a bedding-in period during the first weeks after installation. The polyester base yarns settle slightly under load, and the fabric will relax by approximately 2–5% of its initial pre-tension value. A re-tension check and adjustment at 4–6 weeks post-installation is standard practice and should be included in every installation contract.
Special Considerations for Large-Span PVC Tensile Fabric Structures
Structures with clear spans exceeding 15 meters introduce additional complexity that goes beyond the standard installation sequence described above.
Panel Joining and Field Welding
PVC tensile fabric is manufactured in rolls typically 1.5 to 5 meters wide. Very large canopies require multiple panels to be factory-welded together before delivery. For extremely large structures where shop-welded panels are too large to transport, field welding using hot-air welding equipment may be required on site. Field welds require controlled conditions — temperature, humidity, and surface cleanliness all affect weld quality. A properly executed PVC hot-air weld achieves bond strength of 90–95% of base fabric strength.
Intermediate Support Cables and Catenary Edges
Large-span tensile structures often incorporate stainless steel catenary cables along free edges or intermediate support lines. The interaction between cable tension and fabric tension requires coordinated adjustment during installation. Cables are pre-tensioned to specified values using turnbuckles, and fabric tension is calibrated relative to the cable geometry. This requires engineering supervision and is not a task for untrained workers.
Staged Installation for Multi-Panel Assemblies
When a large roof consists of multiple adjacent panels, installation must follow a defined sequence to prevent completed panels from being distorted by the tensioning of adjacent panels. Typically, installation proceeds from the centre of the structure outward, or from the highest point downward, depending on the structural geometry.
Post-Installation Inspection Checklist
Once installation is complete, conduct a thorough inspection before signing off on the project. This protects both the installer and the client by documenting the condition of the structure at handover.
- Walk the full perimeter and inspect every fixing point — keder seating, plate bolt torque, or rope seating in channel
- Check the fabric surface from ground level for wrinkles, uneven tension areas, or visible distortion
- Inspect all weld seams for delamination or bubbling — any seam that can be peeled by hand has failed and requires repair
- Confirm all drainage points and low spots in the fabric geometry are directing water away from the structure correctly
- Check that no fabric edge is in direct contact with steel or sharp edges that could cause abrasion over time
- Photograph all fixing points and the overall installed structure for the project record
- Record all torque values applied, materials used, and ambient conditions during installation in the maintenance file
- Provide the client with the manufacturer's care and maintenance instructions for the specific PVC tensile fabric grade installed
Maintenance Schedule to Protect Your PVC Tensile Fabric Investment
Installation is the beginning, not the end of the work. A structured maintenance program extends the service life of tensile fabric structures significantly. The table below outlines recommended maintenance intervals for commercial PVC tensile fabric installations.
| Frequency | Task | Purpose |
|---|---|---|
| 4–6 weeks post-install | Re-tension check and adjustment | Compensate for initial fabric bedding-in |
| Every 6 months | Visual inspection and surface cleaning | Remove biological growth, maintain coating |
| Annually | Full fixing point inspection and torque check | Identify loosening due to thermal cycling |
| Every 2–3 years | Professional structural inspection | Assess fabric condition, tension calibration |
| After severe weather events | Immediate full inspection | Identify storm damage before next load event |
Use only pH-neutral, PVC-compatible cleaning solutions for surface cleaning. Avoid high-pressure washers directed at weld seams or fixing hardware — sustained high-pressure water can force water under plate clamps and accelerate corrosion. A soft brush with diluted neutral detergent, followed by a clean water rinse, is sufficient for routine cleaning.
When to Call a Specialist: Limits of DIY Tensile Fabric Installation
Not every tensile fabric project is suitable for self-installation or general contractors without specific experience. The following situations require a specialist tensile structure installer or structural engineer involvement:
- Any structure with a clear span exceeding 10 meters
- Structures in high-wind zones or coastal environments where corrosion and wind loading require specific engineering inputs
- Any installation requiring field welding of PVC tensile fabric panels on site
- Structures over public spaces such as footpaths, car parks, stadiums, or transit areas where structural failure would have serious consequences
- Projects requiring engineering certification for council approval or building permit compliance
- Any re-tensioning or repair work where the original installation documentation is unavailable
Hiring a specialist for complex installations is not just about quality — it is about liability. If a structure fails and injures someone, the absence of qualified installation and engineering documentation creates significant legal and insurance exposure for the building owner.